
Join Crown Rewards
No Rules. Just Art.
No Rules. Just Art.


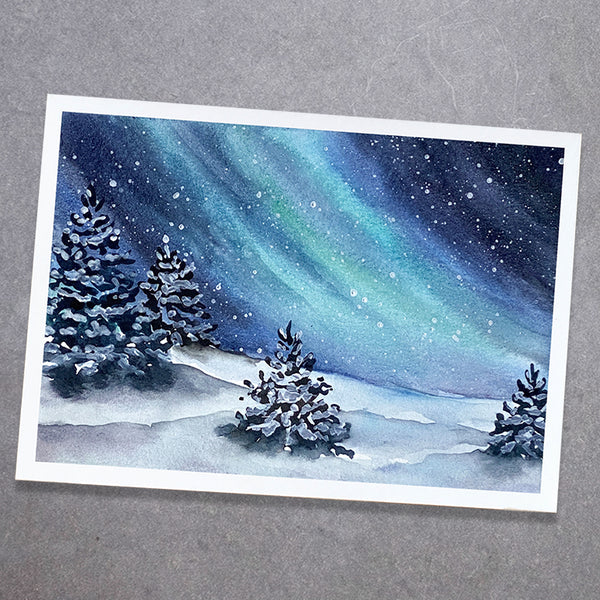
If you look up to the winter sky, you’ll find more than just snowy white scenes and instead see the gradient range of white to blue to black. Watercolor artist Bethany Carroz of West Oak Watercolor recognizes this range in beauty with her beginner friendly watercolor painting tutorial. Follow her step by step photo tutorial to create your own winter scene on a holiday card this winter season.
Winter Scene Holiday Card Supplies:
- KINGART® PRO Artist Watercolor Paint, 12ml (.4oz), Set of 24 Unique Colors
- KINGART® Original Gold® 9040 Round Stroke™ Series Premium Golden Taklon Multimedia Artist Brushes – size 8
- KINGART® Original Gold® 9100 One Stroke Series Premium Golden Taklon Multimedia Artist Brushes – size 1
- Watercolor paper – I cut my sheet to 10x7 so I can fold into a 5x7 card
- Jar(s) of water
- Palette to mix colors
- KINGART® PRO Graphite Sketching & Drawing Pencils, Set of 12
- Masking tape – tip: stick the tape to your pants before applying to the paper so there is less chance that it will rip your paper during removal.
- An old toothbrush
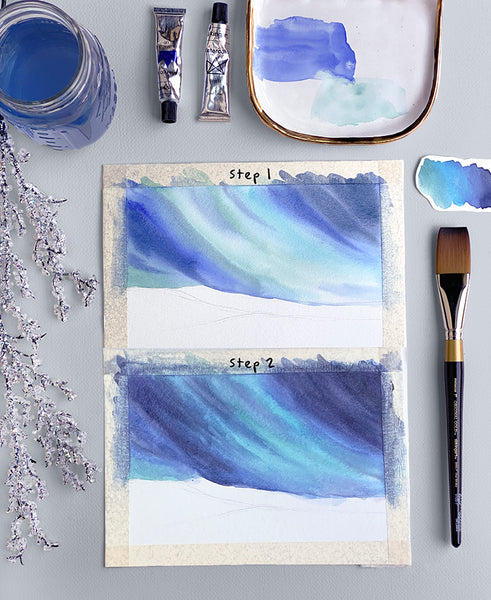
Step 1:
- Tape off your card if desired to keep the edges clean.*I used 4 colors in my sky to get the desired effect – 1. Cerulean Blue + Yellow Orange as my lightest color in the middle 2. Cerulean Blue 3. Ultra Marine 4. Ultra Marine + Vermillion + black. You could add in yellow, purple or pink – just look up a few reference photos of the Northern Lights to see how the colors work together!
Step 2:
- Because this is a night sky, we will have to work up to the color depth with layers. After your sky has completely dried, re-wet the sky with clean water and your 1” one stroke brush.
- Follow a similar process to step one for adding all of your sky colors. You can mix in a few streaks of your darker colors inside of the lightest color.
- Dry completely, and repeat if necessary one more time. The sky from my example has three layers.

Step 3:
- To create snow/stars, place a pea sized amount of white paint on your palette.Step 4:
- To create tree silhouettes, use your round stroke brush and the darkest color from your sky. You will want a thicker paint consistency to get a very dark color on your paper.
- Hold your round stroke brush at a 45 degree angle and press first the tip and then the belly of the brush down onto the paper where you would like your first tree. I love to work from left to right across my paper to add these trees. The branches on the outside edges of the trees often point outward and slightly up. - -- Make sure to leave some white space between the branches!
- After you have worked your way to the bottom of the tree, rinse your brush with clean water and then swipe it across the paper touching the bottom branches to create a shadow under the tree.

Step 5:
- Continue adding a few more trees to draw the eye across the page.Step 6:
- Once all of the trees are dry, use your round stroke brush to get a very thick consistency of white paint and dab onto the branches. If you think about the way snow settles on a tree, it’s typically on the top side of the branches, leaving some of the dark branch to show underneath.Follow Bethany on instagram to get inspired by her watercolor painting talents!


Leave a comment